Scanning at the Library
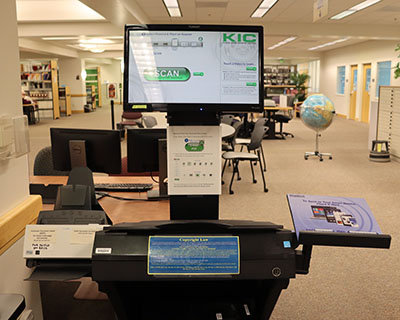
The KIC scanning station by the Reference Desk in Barber Library offers a BookEdge flatbed and automatic document feeder (ADF) scanners.
On This Page
Scan Documents
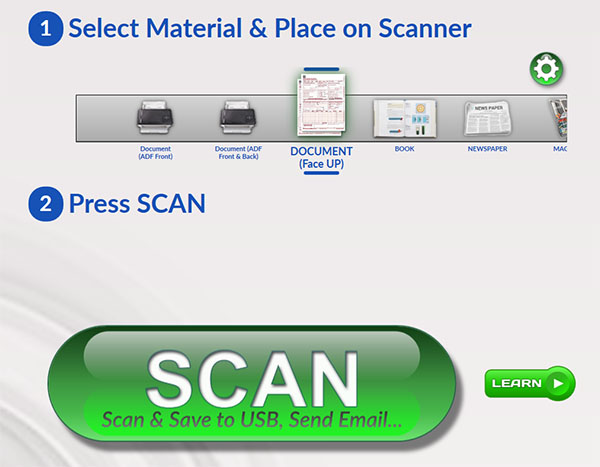
Below is an image of the first screen you'll see at the scanning station.
How to use the BookEdge Flatbed
The BookEdge flatbed scanner can scan books and documents up to 11"x17".
- Under "Select Material & Place on Scanner," slide the carousel to select DOCUMENT, BOOK, or another material type.
- If necessary, touch the cog icon to select your desired brightness, contrast, resolution, color mode, scan mode and/or orientation.
- Place your item face down on the flatbed scanner.
- Tap the big "Scan" button.
- Accept the copyright notice, and the BookEdge will scan your document.
- To scan multiple pages, place another page on the flatbed and tap "Scan" again.
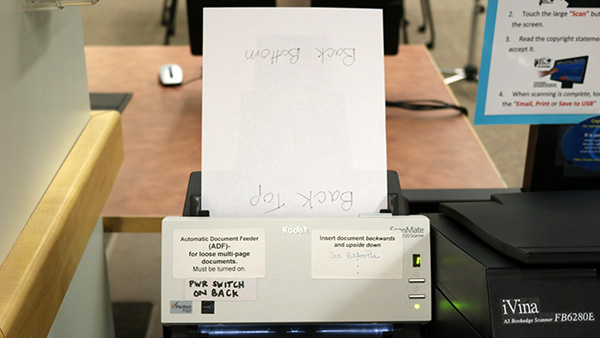
How to use the Automatic Document Feeder (ADF)
The ADF scanner can scan multiple loose-leaf pages at once.
- Under "Select Material & Place on Scanner," slide the carousel to select either "Document (ADF Front)" to scan one-sided pages or "Document (ADF Front & Back)" to scan pages with content on both sides.
- If necessary, touch the cog icon to select your desired brightness, contrast, resolution, and color mode.
- Insert the pages into the ADF attachment backwards and upside down.
- Tap the big "Scan" button.
- Accept the copyright notice, and the ADF attachment will process the papers.
Modify Scans
After scanning, images can be rotated and cropped in the "Compose Content..." section. For assistance, ask the librarian at the Reference Desk.

Export Scans
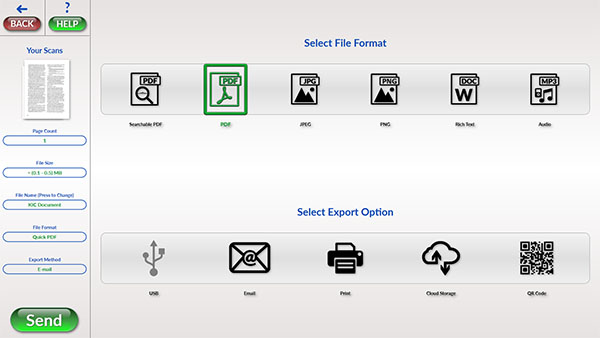
Note: Direct printing from the scan station is not available. If you wish to print scanned documents, you will need to email them or save them to a flash drive, then log in to one of our other computers to use the Bobcat PRINT system to print.
Tap "E-Mail PDF" to send a plain PDF to an email address.

To export your scanned documents in other ways, tap the round "More" button to the top right of the email button. Documents can be saved...
- To a USB flash drive
- To a Google Drive or Dropbox account (under "Cloud Storage")
- To a mobile device via QR Code
The default document type is a plain PDF. You can also choose one of the following additional formats.
- Searchable PDF
- JPEG
- PNG
- Rich Text File
- Audio (MP3)
End Session
Tap "End Session" after saving and/or printing your documents. All images will be permanently deleted. Scanned images cannot be recovered from the computer after a session has ended.
Questions