Desktop Security
Introduction
Central Oregon Community College's network requires that Staff and Faculty change their password every 180 days for adherence to the College's password policy. These passwords must be complex (use 8+ characters, a numeric, and a combination of upper / lower case). Additionally, screen savers must lock the computer automatically if unused: 40 minutes for office computers and 15 minutes for open-area computers (such as in the Admissions and Records bull pen). For Faculty who predominantly work remotely, COCC provides AD Self Service Password which allows the Faculty member to change (or recover) their password remotely.
The following instructions will guide a user through the steps to implement this standard. These steps include changing their Windows password, Banner password (if applicable), set a locking screensaver, and signing up for AD Self Service Password management (only required once).
1) Changing Windows Password
1.1) While logged into your windows computer, press the CTRL-ALT-DEL keys simultaneously.
1.2) Click the "Change a Password" option.
1.3) Type your current password, and your new password, twice, in the available text
boxes.
1.4) Click the right arrow button ore press Enter. You should see a confirmation message.
1.5) If you receive an error message, read it carefully. Make sure you are meeting
the password requirements below.
Password Requirements
Passwords must be 8 or more characters in length.
Passwords must start with a letter (upper or lower case).
Passwords must include both upper and lower case letters.
Passwords must include at least 1 numeric.
The network requires that your Windows password change every 180 days (twice a year).
Passwords may not be re-used. The network remembers your previous 24 passwords and
will not allow re-use.
Changing this password affects:
Web Email, Help Desk(s), Remote Desktop, Web Editor, smartphones and tablets that retreive your COCC.edu email.
Changing this password does not affect:
Bobcat Web, Canvas, R25 and most other services.
2) Change Banner Password (Banner Users Only)
2.1) Log into a new Banner session.
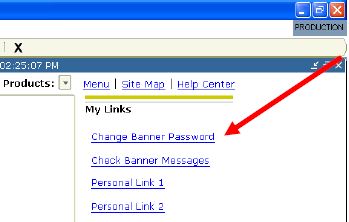
2.2) Under the "My Links" section of the Banner screen, choose "Change Banner Password". 
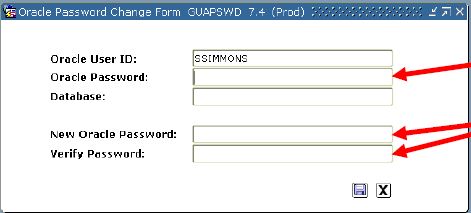
2.1) A pop-up box will appear.
2.4) In the "Oracle Password" field type you current Banner password.
2.5) Do not enter anything in the "Database:" field.
2.6) Enter your new Banner password in the "New Oracle Password:" field.
2.7) Enter your new Banner password again in the "Verify Password:" field. 
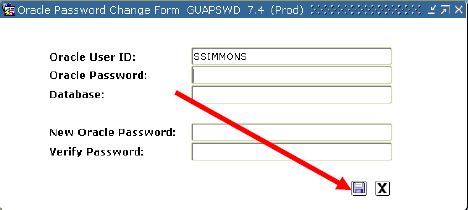
2.8) Click the floppy disk icon (next to the "X" button) to save the new password.

3) Setting a Locking Screensaver
Windows 7
3.1) From the Start menu, select "Control Panel".
3.2) When the Control Panel window opens, select "Appearance and Personalization".
3.3) Then select "Change screen saver" (under "Personalization").
3.4) In the Screen Saver select any screen saver except Bubbles (because Bubbles shows
your confidential information while the screensaver runs).
3.5) In the Wait box, choose either 40 minutes if your computer is in an office, or 15 minutes if your computer is in an open public area.
3.6) Press the "OK" button from the bottom of the window.
MAC OS X
3.1) From the Apple menu, choose "System Preferences".
3.2) Click "Desktop & Screen Saver".
3.3) Click "Screen Saver", and then use the slider to choose 40 minutes.
3.4) Optionally, set up a hot corner to let you invoke the screen saver manually:
3.4.1) Click the Hot Corners button
3.4.2) Click the list next to the corner of the screen you want to use as a hot corner
and select "Start Screen Saver," and then click OK.
3.5) Click Show All to go back to the main "System Preferences" window.
3.6) Click Security, and then click Require password to wake this computer from sleep or screen saver.
3.7) Close the "System Preferences" window.
4) Enrolling in AD Password Self Service
AD Password Self Service allows faculty who work remotely to change their password when required. It also allows Staff and Faculty to unlock / reset their own password without placing a call to the End User Services department. There is a one-time registration required.
4.1) Open a web browser (Firefox or Safari is preferred).
4.2) Click on the "Employee Login" icon.
4.3) From the row of icons under "Employee Login" choose "COCC Email/PC Password Reset".
4.4) Enter your windows network user name into the "User Name:" field.
4.5) Enter your windows network password into the "Password:" field.
4.6) Enter the green captia text into the field field below the green text.
4.7) Click the "Login" button.
4.8) Uncheck the "Hide Answer(s)" checkbox and your typed answers will become visible.
4.9) For each drop-down Que: field, select a question you are comfortable with.
4.10) Enter an answer into the "Answer" text field. Each answer must be 5 characters or longer.
4.11) Press the "Update" button on the bottom of the web page.
4.12) You are now enrolled in AD Password Self Service. You may use this in the future
to change your password or unlock your account.

